Discover your own creativity. Take a break at the Creative Arts Cafe providing space, tools, materials, guidance and cleanup so you can have freetime fun :~D * BYOB, baby
Paper Engineering: Popups and
Foldouts, foldins
lanterns
Xtreme paper jets
Popup Kiss
Papermaking ~
Pulp FictionS:
. HomeMade Shred
. Seed infused
. Native Plants
. Paper casting
. Paper blasting
Molds 101
Plaster & Bisque
Flexible Rubber
Artwork and Screen:
PhotoEZ screen for project
2 small test pieces of PhotoEZ paper
artwork transparency*
*vellum or tracing paper will work but you may lose some detail
contact frame:
glass and backing board
binder clips x 6
sheet of foam
exposure:
bright sunlight
timer
blockout sheet
washout:
water basin
soft brush
plastic screen support
paper towels
For the printing you will also need squeegee(s) and screen-printing ink appropriate to your material, cloth or paper to print on. Simply tape into the frame of your choice after exposure, or use duck tape as a flexible waterproof frame for a wider ink margin.
1. Create Your Artwork:
Using the transparency, create a black and white image on computer or draw it by hand. Laser printers work best but there are some inkjet transparencies available. ***Set your printer option to 'film' and 'best'.*** The key to a crisp design is very high contrast. Artwork must be black and white only, no gray, not even a very dark gray. You want a clear background with an opaque image.
*old printer's tip: If you are not happy with the density of the ink printed on your transparency film, print out a duplicate and line them up as one when you expose.
To freehand use a black sharpie, and fill in any streaking. Check opacity by holding it against a window.
Leave at least 1/2" around the border of your design to allow for mounting. A one inch all around border is even better. It makes the actual screenprinting part easier.
2. Contact Frame:
This is just what it sounds like: a frame to press the artwork flat and keep it in close contact with the screen.
Before you make your screen, make sure this is ready to go.
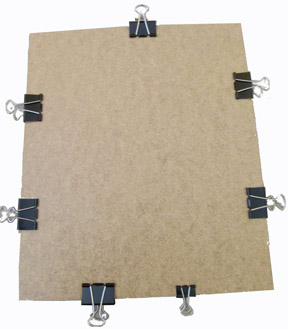
You're making a kinda pressed sandwich.
Simple ingredients, important order:
First slice of bread: a firm board.
Second layer, the thin soft foam (funfoam ok)
Third layer, the screen - emulsion side UP.
Fourth, your artwork. (Reversed ! Be sure the 'right' side is flat against the emulsion screen.)
Last and importantly a clean glass layer
Six binder clips placed as shown will press these layers tightly together. Tight contact is very important to a clear image.
3. Prep Film and assemble:
Work in a dimly lit room.
Place board on flat surface, place foam on board.
Cut PhotoEZ film to size with the 1/2" to 1" border. Remove the clear plastic protector layer if there is one.
Center the sheet, shiny side up, on the foam board.
Place transparency face down on top of the PhotoEZ™ sheet.
Place the clear glass on top of the transparency. Clip firmly together to insure a tight contact.
Cover Contact Frame assembly with a piece of cardboard or a box lid, to block light until ready to expose.
4. Expose the screen!
*IMPORTANT: Before using a full sheet of the PhotoEZ, make sure you test a small piece first so if you mess up, you don't ruin a full sheet! Exposure times will vary depending on the time of day and brightness of the sun.
The following times are guidelines and based on a sunny day between 10am to 2pm.
Set your timer for 30 seconds for PhotoEZ™ Standard, 22 seconds for High Resolution sheet.
Position the Exposure Frame perpendicular to the sun's rays.
Remove the protective top and start your timer.
Replace the protective top when the time is up.
Indoor Timing: see table below. based on 15" distance from source: 100W compact fluorescent lamp
5. Washout :
After exposing screen for appropriate amount of time, cover the layer unit with magazine again (to avoid over exposure) and bring inside.
In a dim room, unclip the unit and place the PhotoEZ screen into a tub of water to soak for at least 10 min. At this point, the silk screen can be left in the container for hours or days without harm if light does not reach it.
Remove emulsion and still working in dim light, place it on the plastic screen for support. Use a kitchen faucet spray to gently rinse the softened emulsion off. You may also use a soft brush or sponge. No scrubbing! Stop occasionally to check for any blockage (emulsion left on the image) by holding your screen printing stencil up to the light before proceeding to the next step. * The HiRes is very fine and may require a higher force stream of water to clear the image completely.
6. Curing :
Blot dry using paper towel. Expose the screen to direct sunlight again for 10 to 15 minutes with emulsion side up to cure and harden completely. Make sure screen is dry before using.
Once cured, the screen is no longer sensitive to light. Store flat at room temperature. Properly developed and stored, screens can be used over and over.
PhotoEZ and StencilPro Exposure Timing Chart * (Using 100w Compact Fluorescent Light in Clamp Reflector)